recipe

Citrus Salt and Sugar Recipes + Printable Labels


Flavored sugars and salts are a wonderful way to add a new dimension to your every day recipes, from hot to cold drinks; baked goods, and savory dishes.

You don't have to spend much money on them, and you can easily make your own. Flavored salts and sugars are also great for gift giving, so I've made some printable labels that you can download for free.

Citrus Sugar
Makes ~8 ounces

  • 1 cup granulated sugar
  • 2 TBSP citrus zest - choose from lime, lemon, and orange, or use them all!


Place zest and sugar in a food processor for 30 seconds, or whisk together very thoroughly. Spread a thin layer across a baking sheet, and let dry for 24 hours. Store in an airtight container.

Lemon Salt
Makes ~4 ounces

  • ½ cup course grain salt
  • Zest of one lemon


Mix lemon zest and salt together, and allow to dry on a pan overnight, or in an oven set to 225 F for 2 hours. Store in an airtight container.

Free Printable Labels


This free, citrus salt and sugar label printable features 11 labels in 4 different styles: 3 citrus salt labels; 3 citrus sugar labels; and 5 blank labels for your own customized blends.

Print these labels on sturdy white card stock for best results, with your printer set to portrait mode; Fit to page; and best quality print.

You can cut them out with scissors, or use a large round punch, if you have one. Thread them through a sticker machine, or turn them into gift tags with string.

Enjoy!

These recipes and labels first appeared in the 2013 issue of Snowed In Magazine. You can read the entire magazine here.

The Best Sugar Cookies and Butter Cream Frosting Recipe. Ever.


This is the sugar cookie recipe our friends and family always ask for. This is my Grandma's Sugar Cookies and Butter Cream Frosting recipe. I crave these cookies all year long - and why not have sugar cookies for every holiday?

People love the sugar cookies that come out of this recipe because they are light, fluffy, and soft. If you do not want soft and fluffy cookies, then this is not the recipe for you. The butter cream frosting is the perfect consistency for spreading. I have yet to find another sugar cookie that tops this recipe, so please, enjoy!

You might also like: my top 10 tips for the perfect sugar cookie

INGREDIENTS
  • 2 sticks unsalted butter – softened
  • ¼ c. milk
  • 2 tsp. baking powder
  • ½ tsp. baking soda
  • 1 tsp. vanilla
  • 3 eggs
  • 2 cups sugar
  • 4 cups flour
DIRECTIONS

Mix butter and sugar. I use a fork to mash the two together until evenly mixed.

Add eggs and vanilla, followed by milk, stirring well.

Add dry ingredients - we usually use a little less than 4 cups of flour, because when you are rolling out the dough you use flour which adds to the dough. If there is too much flour it can make them very dry.

Stir until smooth. Refrigerate dough for at least 1 hour before rolling and cutting cookies. For fluffier cookies, refrigerate dough overnight.*

Remove dough from refrigerator, and roll out onto floured surface. Remember not to roll the dough out too thin unless you like them thin and crispy.


Bake at 350 degrees for 8-11 minutes depending on your oven and what you are cooking them on.

Let cool before frosting.

*While the dough is setting in the fridge, you can make the frosting. If refrigerating overnight, make the frosting right before you're reading to roll, cut, and bake the dough; however, you can make it ahead of time and store in an air-tight container in the fridge a day or two in advance. Simply remove it from the fridge about an hour or two before using it, so that it is not too stiff to spread on the cookies.

Butter Cream Frosting
  • 1 stick unsalted butter softened
  • ¼ tsp. salt
  • Up to 4 tablespoons of milk – start with 2 and go from there
  • 1 tsp. vanilla extract
  • Powdered sugar- continue to add until the right consistency for frosting, up to 2 cups*
*So, you've noticed that I did not put an amount for the powdered sugar? This is because the amount of powdered sugar you will use depends entirely on the desired consistency of the frosting.

Mix together your softened butter, salt, 2 tablespoons of milk, and vanilla.

Start with 1/2 cup of powdered sugar, and stir in. In 1/4 cup increments, add more powdered sugar and stir, until it's as thick or thin as you like. I recommend somewhere between 1.5 - 2 cups of powdered sugar, total.

If you find that you have added too much sugar and it's too stiff, then add another tablespoon of milk, up to four tablespoons total.

When you are happy with the consistency, separate your frosting into however many colors of frosting you will be using. Once separated, add in you food coloring.

After frosting cookies, leave them in the open air so the frosting can harden just a bit.

We also separate each layer of cookies with waxed paper so they don’t stick together, and add a slice of bread inside of the container, which keeps the cookies moist while the bread dries out.

These cookies also freeze and thaw really well - we've made them up to a month in advance of eating them and kept them fresh by freezing. They'll also store well in an air-tight container for over a week - if you don't eat them all first :)


DOUGH INGREDIENTS
  • 2 sticks unsalted butter – softened
  • ¼ c. milk
  • 2 tsp. baking powder
  • ½ tsp. baking soda
  • 1 tsp. vanilla
  • 3 eggs
  • 2 cups sugar
  • 4 cups flour
FROSTING INGREDIENTS
  • 1 stick unsalted butter softened
  • ¼ tsp. salt
  • Up to 4 tablespoons of milk – start with 2 and go from there
  • 1 tsp. vanilla extract
  • Powdered sugar- continue to add until the right consistency for frosting, up to 2 cups
COOKIE DIRECTIONS
Mix butter and sugar - use a fork to mash the two together until evenly mixed. Add eggs and vanilla, followed by milk, stirring well. Add dry ingredients (tip: we use a little less than 4 cups of flour, because when rolling out the dough you use flour which adds to the dough. This allows for a moister cookie).

Stir until smooth. Refrigerate dough for at least 1 hour before rolling and cutting cookies. For fluffier cookies, refrigerate dough overnight.

Remove dough from refrigerator, and roll out onto floured surface. If you want thick and fluffy cookies, roll the dough to about 1/4" to 1/3"; if you want crispier cookies, roll it thinner. Bake at 350 degrees for 8-11 minutes depending on your oven and what you are cooking them on.  Let cool before frosting.

FROSTING DIRECTIONS

The amount of powdered sugar you will use depends entirely on the desired consistency of the frosting (up to 2 cups of powdered sugar).

Mix together your softened butter, salt, 2 tablespoons of milk, and vanilla.

Start with 1/2 cup of powdered sugar, and stir in. In 1/4 cup increments, add more powdered sugar and stir, until it's as thick or thin as you like. I recommend somewhere between 1.5 - 2 cups of powdered sugar, total. If you find that you have added too much sugar and it's too stiff, then add another tablespoon of milk, up to four tablespoons total.

When you are happy with the consistency, separate your frosting into however many colors of frosting you will be using. Once separated, add in you food coloring. After frosting cookies, leave them in the open air so the frosting can harden just a bit.


Thanks for reading, and enjoy!
Ashley

Never miss a post! Receive email updates right in your inbox:


Easy Homemade Air Fresheners


Since moving to our new home two weeks ago, I have been experimenting with incredibly easy air fresheners that can be made on your own stove top, using ingredients you likely already have.

Ever since I became pregnant with my first daughter almost four years ago, I've been wary to use store-bought air fresheners, and deliciously scented candles can be very expensive.

A tip from a friend opened floodgate of ideas for scenting my slightly musty new home - "just simmer some cinnamon sticks on a burner in some water." Bingo. Not only is super-cheap, but it works and smells amazing throughout the whole house.

To make them is simple - pour about a cup into a small pot and let it simmer on the stove for as long as you'd like. Change up the ingredients with different scents. I've been experimenting with new scents all week - here are some of my favorites:

Apple "Cider"
- apple peels
- cinnamon sticks
- cloves

Autumn
-  a drop of maple syrup
-  cinnamon sticks

Orange Clove
- orange peels and,
- you guessed it - cloves

Late Summer Citrus
- Lemon peels
- vanilla bean pod

The "William"
- lemon slices
- rosemary sprigs
- vanilla extract

Gingerbread
- a dash of molasses
- vanilla extract
- ginger

Winter is coming
- a dash of peppermint extract
- a dash of vanilla

Piney
- a few cut-up pine needles
- peppermint extract


Pin It

Homemade Green Tea Frappe Recipe


A quick note: I originally published this post as a guest post for GHTR.

One of my favorite frozen drinks is the green tea frappe. I can't exactly explain why - it has a very unique flavor. There is a slight bitterness from green tea, but in this drink, it's complimented by the sweetness of milk and cream. Blended with ice, this drink is a cool treat for warm weather.

I was interested in making this drink after having them at Starbucks. In coffee houses, green tea frappes are almost always made with matcha green tea - a powdered form of green tea leaves. My recipe does not use matcha powder; rather, a more traditional method for blending lattes into frappes. Because of this, this recipe will not produce the signature green color of matcha powder - the frozen drink will be tea-colored.

ingredients
brewed green tea
3 additional green tea bags
1/2 cup sugar
1/2 cup water
1 tsp vanilla
1 cup crushed ice cubes
1/2 cup milk*

optional whipped cream topping
1/2 cup whipping cream
2 tablespoons sugar

* milk can be switched for any other milk substitute, such as soy or rice milk.

directions

Start with the green tea-infused simple syrup. Heat sugar and water in small sauce pan, stirring often. Bring to a boil, and add vanilla. Let boil for about 30 seconds, and remove from heat. Immediately drop in 3 green tea bags, and let tea bags steep in syrup until syrup as cooled completely; remove tea bags.


Next, brew a cup of green tea - I made mine extra-strength, with two tea bags. Let tea cool completely.

Crush ice in a blender until it is fine enough to be consumed with a straw. Fill a cup with crushed ice. Pour in 1/2 cup green tea, 1/2 cup milk, and 1/4 cup of green tea syrup; stir. Experiment and adjust with more or less tea, milk, or syrup to get the flavor that you enjoy.


Directions for whipped cream

Combine whipping cream and sugar in a bowl; beat with a hand-mixer on high for 3 minutes or until cream is thick and fluffy. Spoon onto top of green tea frappe.

Blueberry Pie + The Perfect Pie Crust


My journey to pie making started when I received this little quote about aprons, via email:

"Remember: Grandma used to set her hot baked apple pies on the window sill to cool.  Her granddaughters set theirs on the window sill to thaw."

I thought, "Hey! We can too, bake real pies!" It's true that most of us don't because frozen pies and pie shells are so convenient. It is a skill that my grandma knew well, and she would often be making more than one kind of pie at a time. I loved her pies (especially the lemon meringue!), and it's a skill I want to have for my children and grandchildren as well. It's really not like I feel I need to prove anything, it's really more about wanting to pass on the tradition of pie baking from my grandma to my own kids.

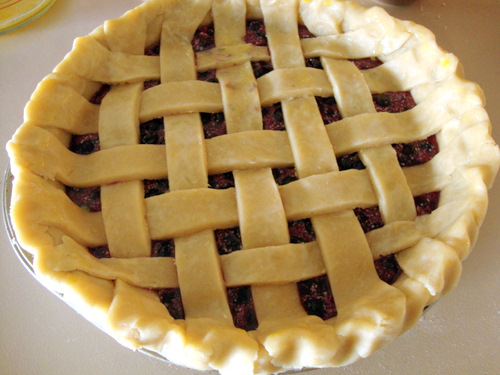
So, pictured above is my first, 100% made-from-scratch pie - and it was amazing. So good that I had to send the second half of it with my husband to work, lest I eat the whole thing myself today. 

Below you can find my recipe for both pie crust and blueberry pie filling. Still not sure that making pie crust isn't scary? Read my Top 8 Tips for the Perfect Pie Crust.

Pie Crust


Ingredients
  • 2 sticks of unsalted butter*
  • 1 tsp salt
  • 1 tsp sugar
  • 2 1/2 cups flour
  • 4 tablespoons of ice water


* If you are looking for vegan alternatives, try these recipes from SavvyVegetarian.com and About.com, which use vegan margarine in place of butter, and use the same production and assembly techniques outlined here.

Directions


In a bowl, combine the flour, salt, and sugar. Cut the sticks of butter into chunks and add to the dry ingredients, squeezing butter into the mixture by hand. Continue to combine until a crumbly ball has formed.


Add three to four tablespoons of ice water to dough. For me, three tablespoons were enough; however, you can use more than four if your dough is especially dry. Knead dough until fully soft and free of crumbles. Roll the dough into a ball, cut it in half, and press it into two flat discs.


To prevent sticking, wrap the discs in plastic wrap. Refrigerate for one hour. 

While you wait for the crust, you can prepare your blueberry. 

P.S. my perfect pie crust recipe first appeared as a guest post by me on Going Home to Roost!

Blueberry Pie Filling

Ingredients

  • 4 cups blueberries (2 pints) - I used frozen because fresh are too bitter right now
  • 3/4 cup sugar 
  • 3 tablespoons cornstarch 
  • 3 tablespoons water 
  • 1/2 teaspoon cinnamon 
  • 1/4 teaspoon ginger 
  • 2 tablespoons unsalted butter 
  • For top of pie:
  • 1 egg, beaten
  • baker's sugar for sprinkling on top

Directions

Combine 1 cup of blueberries with 3/4 cup sugar in a medium sauce pan. Heat until sugar melts completely.


While waiting for sugar to melt, combine water and cornstarch in a small bowl, mixing completely. Once the sugar is melted, add in the water/cornstarch mixture. 


Bring to a full boil on medium heat. Remove from heat, and pour into a large bowl. Once the blueberry/sugar mix has cooled to just "warm", stir in remaining blueberries, butter, cinnamon, and nutmeg. Let cool before adding to pie crust.


Assembling the pie


Preheat oven to 400 degrees F. After one hour of refrigeration, remove pie dough and roll flat (1/8" or so thin) between two sheets of floured wax paper. This trick allowed me roll the dough very flat without the dough sticking to my rolling pin and tearing.


When dough is flattened nicely, lay the dough over your pie pan, gently pressing it into the sides and bottom. Cut excess dough of the edges of the pie with kitchen shears, leaving about an inch to fold over and pinch into the outer crust. 

Pour in the pie filling. Since this recipe is for two pie crusts, you can use the second for the top crust of the pie. I decided to give the lattice effect a try, and it was so fun! Simply cut the second rolled crust into strips about 3/4" thick. 

Weave strips of dough over and under, one-by-one, starting with the longest strips in the middle. If it looks confusing, check out this photo tutorial on About.com. 

Brush top pie crust with beaten egg, and sprinkle with baker's sugar (best choice for maintaining sparkle). I did not cover my pie. When putting the pie in the oven, lower the oven temperature to 375 degrees F. 

Bake for 20 minutes, then check crust. If crust is still white, yellow, or slightly brown, leave as is and bake another 20 minutes. If crust is already browning, wrap just the outer crust with strips of foil before baking for another 20 minutes. 


I let the pie cool for about 15 minutes, and it was better than I ever imagined it would be. My husband was generally against all fruit-based pies, saying "why have berries when you could have peanut butter or pecans?", but I have officially convinced him of the joy that is a blueberry pie.


Edit: I've since made this pie again, trying a different crust technique - what do you think of the star cut-outs?


On Instagram

© Nature Apart. Made with love by The Dutch Lady Designs.